Pages

Paper Bag Gingerbread House and a Free Candy Sheet Printable

Facebook Pinterest Chirp Graphics TeachersPayTeachers Teacher's Notebook Image Map
Phew!!  School's out and today is the first day of Christmas holidays! 

I'm most thrilled to have two weeks to wake up WITHOUT an alarm clock!  Ahhhh.......

Although school is on hiatus, we did so many fun activities this past month, I thought I'd squeeze in one more post before Christmas hits!

One of my favourite days this month was our unofficial "gingerbread man" day.

The day began by making a gingerbread craft.

This year we made gingerbread houses using paper bags.


The children coloured paper candies and a door and then glued those onto a lunch bag laid flat on the table.  

We had some fruit loops leftover from another craft, so we set those out for the children to glue onto the bag, as well.

Once the bags were fully decorated, we stuffed in some crumpled paper and stapled a roof to the top.

Here's another finished sample created by one of our 3 year olds.  
(Just pretend the dripping glue is icing!)
We continued the gingerbread theme at circle time.  

Each of the children were given some playdough
that was disguised to look like real dough by making it brown and adding spices.

(You know - teacher trickery!)

Each child used his piece to collectively create a giant gingerbread man on our cookie sheet.

When the g-man was fully shaped, we popped him into the oven "to bake."  

My daughters were volunteering that day and while our cookie was baking, they performed the gingerbread man story with puppets at our makeshift theater.

Usually we cover this theatre/storage shelf with a tablecloth to add some flair, but this day we didn't get to it.  
Not that the children cared.  
They just love the variety of having a puppet show at circle time!

While the kids were watching the puppet show, lo and behold, the gingerbread man magically "disappeared" from the oven. 

The class searched for the escaped cookie by following a series of clues that had been planted throughout our centre.


The gingerbread man was never found, but when we returned to class, he had left a cookie for each of the kids to decorate with icing and candies.  

Not a bad consolation!  

If you'd like a copy of a candy sheet to use for your own gingerbread house, click here to get a free download!
If you'd like to receive my weekly posts and freebies  straight into your e-mail box, just sign up on the sidebar of my blog!  


Happy Holidays!


Christmas Gift Idea for Parents

Facebook Pinterest Chirp Graphics TeachersPayTeachers Teacher's Notebook Image Map


We've been hard at work helping our class create Christmas gifts for their parents.  

We decided to paint some cork hot plates (trivets) for parents to use on their Christmas table. 
(You can find the cork circles at Michael's.)

My daughter made a hot plate for me in preschool long ago and I still have it.
 And I still use it!

To decorate our project, the children added a "snowman print" - with their foot!  

Pretty cute, no?

Here's how we did it:

Step 1 - Children paint the round cork board with blue or green acrylic paint.  Let dry.

Step 2 - Teachers paint the children's feet with white acrylic paint and help place feet on the cork to make the print 


Step 3 - Teacher or volunteer washes feet in a bin of soapy water.  (Children sit in one chair for the print and move to a chair right beside it for foot washing)

Step #4 - Teacher adds details to the foot print with a fine paint brush and Sharpie to turn it into a snowman

This step could also be done by the students if you choose.

You'll need:
 brown paint (stick arms)
 black paint (hat)
 black Sharpie (button eyes, nose, etc.)
 orange paint or Sharpie (carrot nose)

Once our gifts were finished, the children helped wrap them.  
Merry Christmas to you, parents!


Christmas Paper Plate Decoration

Facebook Pinterest Chirp Graphics TeachersPayTeachers Teacher's Notebook Image Map

Wo boy!  Christmas is rapidly approaching.   

Time to catch up on some of the fun things we've been doing this season!

This past week we made some Christmas decorations out of paper plates.  They turned out quite cute!

To make this craft you'll need:

  • small paper plates
  • tissue paper cut into squares
  • liquid glue (with water added to make it more runny)
  • sparkles
  • two squares of black paper to attach back to back at the top of the ornament
  • string or ribbon for hanging


We teachers prepared the plates in advance by taping the loop of ribbon to a square black piece of paper and then stapling this square to the top of the plate.  


Add another black square paper to the back side if you don't want the taped ribbon to show.

Then the children painted the plate with the glue and stuck the tissue papers, decorations, and sparkles on top.

We had them decorate the front and back of the plate so that we could hang them in the windows on a paper garland.

We wanted them to look nice from both inside and out! 
Ta da! 

Next time around, I might have the children paint the plates first so that they look a little less "white" around the edges.  

That would make the project a two step process, but it might be worth it!


FREE set of Starry Night Outer Space Background Papers

Facebook Pinterest Chirp Graphics TeachersPayTeachers Teacher's Notebook Image Map


November has been SPACE month in our classroom.
I've been busy creating lots of space clip art and space resources for the theme.  

My space unit is coming soon and it's packed with fun activities to do with the solar system, astronauts, and even. gasp .... ALIENS! :)

Until I post the arrival of this unit, I'd love to offer you this FREE set of 6 starry night background papers. 


This set could be used for a variety of outer space resources and cover pages, as well as any project where you need a night sky image.

If you like the papers and decide to download them, I'd love it if you'd leave some feedback on them for my Chirp Graphics shop page.  Thanks so much!  

Click here to pick up the set!   

Halloween Games and Activities for Pre-K and Kindergarten

Facebook Pinterest Chirp Graphics TeachersPayTeachers Teacher's Notebook Image Map


Well, it's that time of year again...

Time to rustle around in my closets to decide what I will "BE" for our Halloween party at school this week!

I'm trying to show my daughters that you don't need to buy a new costume every year.
But it's a hard sell!

If you are looking for some Halloween party games, you might want to check out my
Halloween Party Ideas post from last year.  

It includes a number of different games perfect for a Preschool or Kindergarten group.

At school, this past week we introduced some Halloween activities at centre time.

We made a variety of monsters at the playdough table.


 We practised matching pumpkin letters to the leaves in the pumpkin patch.

(By the way, I'll be using this leaf chart again in the spring to match up flower letters)
 The children could either match pumpkins with upper case letters to the leaves, or flip the pumpkins over to match lower case letters.


For those who wanted the challenge of matching lower case to upper case, I created the chart below to use for reference if needed.
   
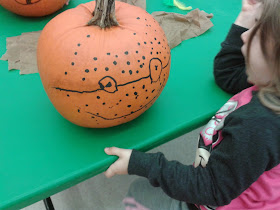
We also spent some time drawing faces on pumpkins with markers.  


Originally I put out erasable markers, but those lines were much harder to wipe off.  

So I switched to regular kids' washable markers.
  They weren't as dark, but they showed up just fine.

This week we'll use the pumpkins again for some new activities.  

I'll try to get the post in before the big day!

Ghost Wind Sock Crafts for Halloween

Facebook Pinterest Chirp Graphics TeachersPayTeachers Teacher's Notebook Image Map

A fun craft that we made with our 4 year olds this week was Ghost Wind Socks.
Can't you just see these cuties blowing around the porch on a dark night?  
Talk about Halloween ambiance! :)

For the most part, the kids were able to make these little ghosties themselves. 

At the end of the process, however, there were two steps that the students needed some help with - stapling the strip into a circle and attaching the handle.
  
(Hence the skimpy number of photos that you'll see documenting this craft!  It got busy at the craft table!)


Here are the materials you'll need to prep for this project:

When the ghosts are completed, just brace yourself for what will be coming next ...
the pleasant sound of woooooooooooo permeating the classroom  (not to mention lots of flying streamers!)

But really, who could blame them?

HOWEVER after a few minutes of hearing (and watching) ghosts circling the classroom in rapid flight, it was time for these little creatures to "take a nap" until going home time!

Teachers can only be so flexible!


If you'd like to read the steps for making this project, they're listed below: 

  1. Lay a white strip of card stock (with a wavy bottom edge) flat on the table 
  2. Add a line of glue across the length of the bottom of the strip
  3. Stick streamers onto the the glue all the way across the bottom of the strip of paper  (Note: Streamers don't all have to be the same length - a variety of lengths actually looks better)
  4. Flip over the paper to the other side
  5. Glue on googly eyes
  6. Draw on a mouth with felt along with any other decorative details desired
  7. Teacher staples the paper strip into a circle 
  8. Teacher tapes on a string/yarn handle to the inside edge (I found taping the two ends of the string much faster than punching holes into the strip and then tying the string through)


Puffy Paint Ghost Craft for Halloween

Facebook Pinterest Chirp Graphics TeachersPayTeachers Teacher's Notebook Image Map


Halloween's just around the corner.
Time to get a little spooky with this fun ghost craft!

Today we made the ghosts below using "puffy paint."

And for once the paint actually stayed puffy!

Some of the ghosts had LOTS of paint
 (which actually made me feel like eating them :0), 
others had a bit of a skimpier coating.
But ALL were very cute!

We gave the children SPOONS to spread the puff paint  (instead of paint brushes like we have in the past) and that seemed to be a better choice.

The kids didn't feel the same need to scrub the substance into the paper as they do with a brush 
(thus removing all the "puff!")

If you'd like to try this craft, here are the materials you'll need:
  • shaving cream
  • glue (just add a big swirl to the bowl of shaving cream and then mix)
  • spoons for spreading the paint 
  • cardstock ghost shapes
  • silver glitter or sparkles
  • googly eyes
  • pieces of yarn (for the mouth)


One thing to note is that the puffy paint takes a long time to dry so you may want to keep these projects overnight before sending them home.

Taking home a wet ghosty craft might scare the moms! :)


For more Pre-K - K ideas, you may want to check out the post that I linked up with below!

FREE Five Little Pumpkins Sitting on the Gate Poem and Colouring Sheet

Facebook Pinterest Chirp Graphics TeachersPayTeachers Teacher's Notebook Image Map

  Halloween is almost here say, "Hurray!"  
Halloween is almost here say, "Hurray!"

These are the final lines to the song I taught the kids at circle time today.  

This tune has been running through my head all day.  Against my will! 
You know you're a preschool teacher when...  :)

The other poem I introduced today was the old classic, 
Five Little Pumpkins Sitting on the Gate.

I think I love this one so much because it was a part of my own childhood! 

And even though it's been around forever, most of my little students have not heard it before.  

That's one of the bonuses of teaching preschool!
We are the first to introduce the children to all of the old favourites!

Sometimes I perform this song using magnet or felt/board images like the ones I created for my clip art shop below.


Sometimes I change things up by using my 
5 Little Pumpkins glove.  

I found an old black glove and I just glued a little pumpkin image to each finger.


Sometimes I use the gate that you see in the image, too, but most of the time I just use the glove by itself.
One less thing to hold!

I usually perform the song twice per circle time while the children are learning it - the first time with the students sitting on the carpet while I use a prop such as my 
magnet board images or glove,
and the second time with everyone standing up and doing the actions with me on a bigger scale.  

This year I also made a printable of this poem with images that the children can colour.

I love using printables like this because they remind and encourage students to perform the song for their parents or siblings at home.  

And although my students can't read the words, their parents can assist them if they'd like help remembering some of the lines.

If you'd like a copy of this printable for your class, just
click {here}.

Hope you're enjoying the Halloween countdown, too!

I'm joining up this post with a linky party 
on the following site(s):


Check them out for more ideas!